Yeast Harvesting and Storage

Yeast: the dynamic driver of fermentation and creator of so many wonderful, complex beer aromas.
If you’ve ever been in charge of buying materials for a batch of beer, you’ve probably noticed that a fresh yeast pitch can be quite expensive. In fact, for many breweries, yeast is by far the most expensive raw input in the production process. So how can brewers cut costs while maintaining quality? The first place to start is simple: don’t throw it away!
Yeast harvesting is the process of saving some yeast from a finished batch of beer and using it to inoculate a new batch. Historically, this was the only way brewers could control the start of fermentation—although they didn’t know what yeast was, they knew adding some of the creamy, smooth sediment to a new batch would kick start a healthy fermentation. Today, although we have pure culture microbiological techniques, harvesting remains a common practice.
Step 1: Cleaning
Before we get into some different strategies for yeast harvesting, there are a few important details to keep in mind. First, no matter what equipment you use, it must be clean and sanitized. Harvesting is a delicate process: if any unwanted microorganisms get into your harvest, they’ll contaminate your next batch. This includes different types of yeast used in different styles of beer, leading to an unwanted flavor, or worse, Lactobacillus or Pediococcus bacteria that can cause the beer to go sour or ropey. Therefore, it’s critical that every piece of equipment is thoroughly cleaned and properly sanitized.
Step 2: How to Harvest Yeast
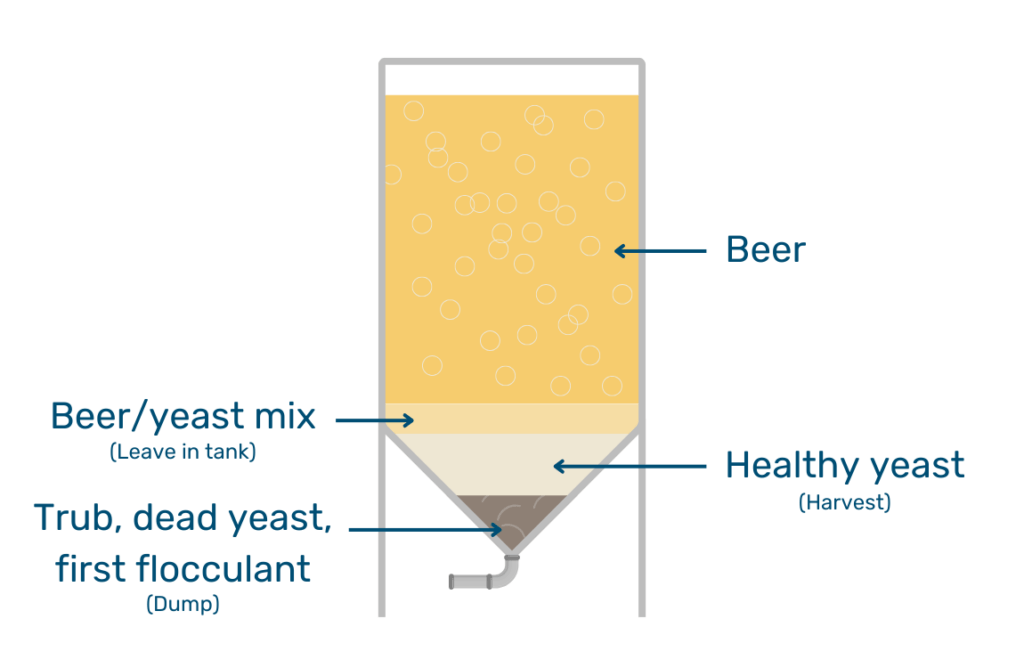
Once your equipment is prepared, harvesting is as simple as connecting to the bottom port of the tank and pushing some yeast out under pressure. But not all yeast is created equal! As fermentation slows and the yeast settles to the bottom of the tank, three distinct layers will form. The bottom layer is mostly trub from the boil, dead yeast cells, and the earliest flocculating yeast cells. This layer will look dirty: it might be slightly grey and will have distinct, visible chunks or solids in it. The middle layer is the bulk of the live yeast and is smooth and creamy in appearance. Finally, the top layer is made up of the yeast cells that settled last and will be thinner and be more beer-like. The middle layer is your target for harvesting. The bottom layer should be discarded, since it’s mostly waste products, and the top layer should be left in the tank.
Fun Fact
One of the reasons it’s important to only collect the middle layer is because of evolution: if you harvest too much of the bottom layer of yeast over and over again, you’ll be selecting the yeast cells that flocculate the fastest. After a few generations, you’ll find that your yeast has become much more flocculent than it was initially, leading to unfinished fermentations!
After harvesting, it’s important to store yeast in the right way. A finished batch of beer is actually a stressful situation for the yeast: after all, ethanol is toxic to the yeast cells and there’s not any sugar left for them to eat. To prolong your pitch, make sure it stays cold in a vessel that can vent excess pressure. Stored correctly, yeast can generally be used up to a week after harvest, but the sooner it’s used the better.
Step 3: Where to Store Yeast
How does this process work in practice? Let’s dive into a few different strategies.
Starting Small…
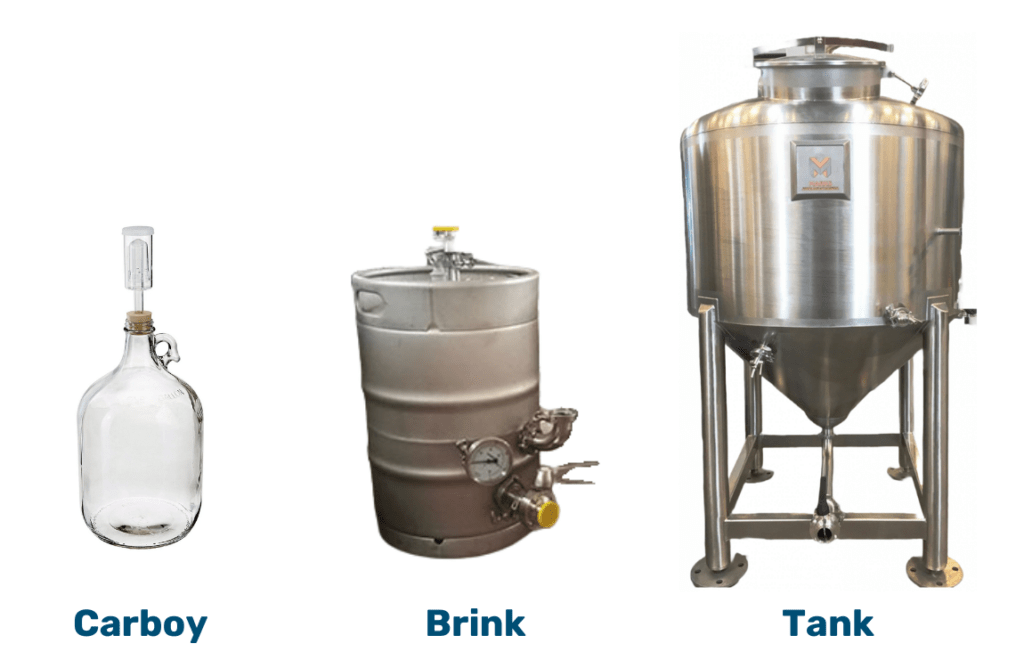
For homebrewers and the smallest brewpubs, your harvesting vessel can be as simple as a glass carboy. After discarding the bottom layer, send the yeast into the carboy through some sanitized tube, set an airlock in the top, and set the whole thing in your walk-in cooler. You may want to get the weight of the empty carboy if you plan on pitching yeast by weight (more on that later). While in the cooler, the yeast will be able to hibernate until your next brew day and the airlock prevents pressure from building up in the meantime. In addition, the glass gives an added benefit of being able to visually inspect the yeast pitch.
Using Brinks
For larger batches, it’s typically more convenient to use a dedicated yeast brink, which is just a half barrel stainless steel keg with some extra fittings. Various brewery equipment companies sell these, which can come with a variety of ports or fittings. However, the harvesting process remains the same. Sanitize the brink and the hoses, connect to the bottom of the tank, drain the bottom layer, and fill the brink up with the smooth middle layer of yeast. As before, you should store your brink in the walk-in until you’re ready to pitch, but make sure the brink isn’t building up pressure! Either vent the airlock a few times every day or set up a simple airlock with some clean tubing and a sanitizer bucket.
Scaling Up
At the largest breweries, so much yeast needs to be moved around that brinks simply aren’t practical. Instead, these breweries will have dedicated yeast storage tanks that can collect harvested yeast. These tanks will have cooling jackets and a mechanical stirrer to keep the yeast cool and well homogenized, and will usually have CIP attachments as well, so that they can be periodically emptied and cleaned.
Step 4: Re-Pitching Yeast
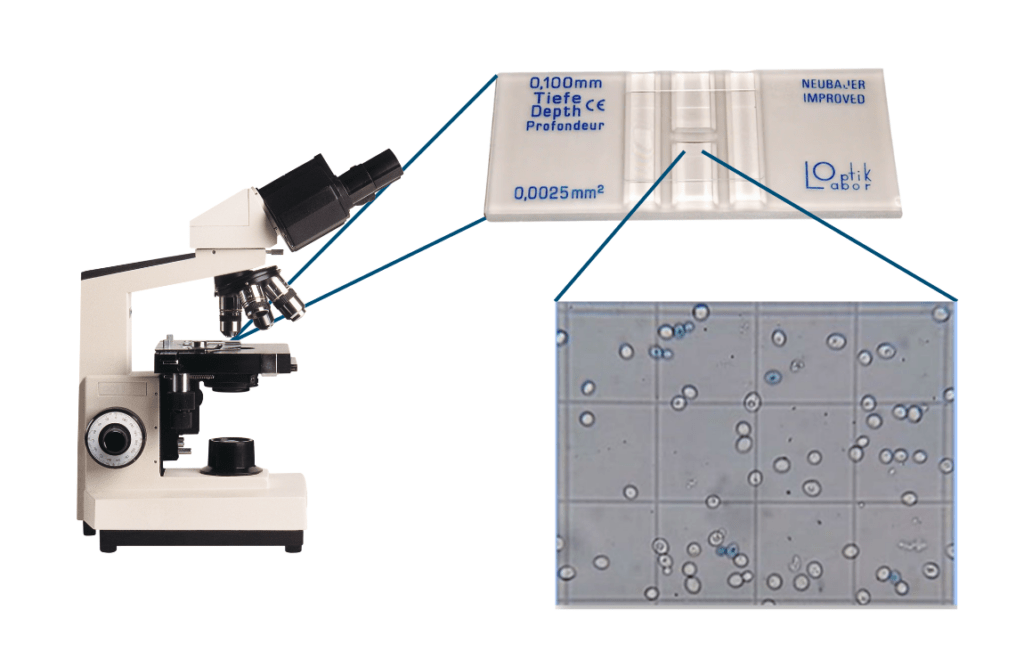
After harvesting, it’s important to know how much yeast to pitch into the next batch of beer. The most accurate way to dial in your pitch rate is to get a cell count of your harvest. This process requires just a few simple pieces of lab equipment—a microscope and hemocytometer—and will provide the exact volume of yeast slurry needed in your next batch. Yeast pitch calculators are available online to help out with the math. In any case, be sure to take good notes at every step of the process so you know what to try for the next batch. Be thorough! Your notes should include everything from the empty weight of your keg or brink, the exact amount of yeast you pitch for every batch, and the appearance of your collected yeast.
No matter what harvesting method you use, if your yeast ends up in the next batch instead of down the drain you’re saving money. By keeping these tips in mind, you’ll be able to collect a clean, healthy pitch of yeast ready to ferment your next amazing brew.