
Water 201
Moisture is the essence of wetness, and wetness is the essence of…water.
You’ve read through the Water 101 post and you’re ready to start adjusting your brewing waterready to start adjusting your brewing water, but the whole thing feels overwhelming. Your water report has a long list of minerals, the calculators are full of boxes and targets, and suddenly a simple brew day starts to feel like a chemistry exam.
Don’t give up just yet. You can make meaningful improvements to your beer without analyzing every mineral in your water.
For many beers, a practical starting point is to focus on four things:
- Mash pH
- Calcium
- Chloride
- Sulfate
That’s an oversimplification, but (hopefully) a useful one. Brewing water can get complicated quickly, and there’s plenty of nuance once you start digging deeper. But if you’re just getting started, focusing on these basics can help you make better, more intentional adjustments without getting lost. Better water adjustments won’t fix every beer, but they can help a good recipe taste more focused, balanced, and intentional.
Quick Notation Note:
Technically, the chemical shorthand shorthand for calcium, chloride, and sulfate includes ionic charges: Ca2+, Cl–, SO42-. To keep this post easier to read, I’ll use the simplified forms Ca, Cl, and SO4.
The Starting Point: What Are You Brewing?
Before you adjust your water, you need to know what kind of beer you’re trying to make. You’re not building a water profile in the abstract; you’re building one that supports a specific beer. The water needs of a pilsner are quite different from a stout.
Understanding the style you’re brewing is what gives those water adjustments meaning. Different styles emphasize different characteristics—bitterness, maltiness, mouthfeel—and your water profile plays a big role in shaping those outcomes. If your water doesn’t support the style, the finished beer can drift away from what you intended, even if everything else in the process is dialed in.
A New England IPA brewed with a Burton-style water profile would taste very different from the typical profile that is brewed with chloride-forward water. If a customer orders a beer expecting the soft, juicy character of a New England IPA and instead gets something sharp and bitter, they’ll be caught off guard. The question isn’t just whether the water is technically sound, it’s whether it supports the experience the drinker expects.
So once you know the style or general direction of the beer, do a little homework. Look for target ranges for calcium, chloride, sulfate, and mash pH that make sense for that style.
Sometimes all that is needed is to find the water profile for the city that’s associated with the style. John Palmer’s How to Brew, 4th ed. and Palmer and Colin Kaminski’s Water are both great resources for this, as is Martin Brungard’s Bru’n Water spreadsheet-based calculator.

Don’t forget pH
Mash pH matters because it affects how the finished beer tastes. A slightly lower mash pH can help lighter beers taste brighter and crisper. In contrast, a slightly higher mash pH can help darker beers better showcase roasty, chocolatey, and toasted malt flavors. Conversely, an overly acidic pH can detract from those flavor elements.
Broadly speaking, mash pH can be broken down into three buckets based on the color of the beer:
- Light: 5.1–5.3
- Amber: 5.3–5.5
- Dark: 5.4–5.6
Why Calcium Also Matters
As we move forward, we’re going to focus mainly on adjusting chloride and sulfate. Those two ions can have a major impact on how the finished beer drinks.
The catch is that the most common salts used to adjust chloride and sulfate also add calcium.
This matters for two reasons:
- Calcium supports fermentation performance, flocculation, and overall brewing process stability—targeting a minimum of 50 ppm is a good idea.
- It’s also possible to have too much calcium (the acceptable range is 50–150 ppm).
Finding Your Starting Water Profile
Once you know the general water parameters for the beer you’re brewing, the next step is figuring out the baseline mineral content of your water. Ideally, that information will come from a technical water report from your municipal water authority or water treatment plant. If you’re in the DC area, the US Army Corps of Engineers manages the water treatment plant and posts their annual reports online.
Unfortunately, those reports can be inconsistent or difficult to find. Some are written for residents and only include basic drinking-water information, while others include the mineral data brewers actually need. If you can’t find a useful report, you may need to contact your water authority directly or have your water tested.1
Keep in mind that water chemistry can change throughout the year, so one report or one test may not tell the whole story.
Turning Your Water Report Into Action
OK, now that you have your water report and a target profile for your next brew, you can calculate the shifts you need to make. From here on, we’re going to assume your mineral targets are higher than what’s naturally in your water. This is because it’s much easier to add minerals than remove them. Obviously, not all breweries have this luxury—more on that later.
Here are the key pieces of information you need to determine:
- Minerals you want to alter: in this case we’re simply targeting Ca, SO4, and Cl, though you may not end up altering all of them.
- Baseline mineral content of your water (as ppm or mg/L)2: this can be found in your water report.
- Target mineral content for your brew (as ppm or mg/L): this was determined when you did your style homework.
- Mash liquor volume: this is in your recipe.
The mash liquor volume is important because mineral content is stated as a concentration. Adding 50 g of gypsum to 10 barrels of liquor will have much more of an impact on calcium and sulfate concentrations than if 50 g is added to 30 barrels.
Crunching Numbers: Enter the Thrill Zone
Once you know your starting water and your target profile, the next step is simple in concept: figure out the gap, then add enough brewing salt to close that gap.
The math looks more intimidating than it really is because brewing salts are expressed as a concentration change: ppm per gram per gallon. In plain English, that means: how much one gram of a brewing salt changes one gallon of water.
The Basic Formula
So how do we get there? With this handy formula:
Salt needed (in grams) = mineral gap (in ppm) ÷ ion contribution from salt × water volume (in gal).3
Here’s how to fill in each part of the formula:
- Mineral gap (in ppm) = target ppm – starting ppm (from your water report)
- Ion contribution = how much a salt provides of a target ion, usually shown as ppm per gram per gallon
- Water volume = mash liquor volume in gallons (not barrels, liters, or hectoliters)
A Practical Example (Pretty Thrilling, Right?)
Let’s try it out with an example. In practice, I’d usually let a spreadsheet or brewing water calculator handle this. In fact, I’ve put together a simple online water calculator you can use for exactly that. The point of walking thr ough the math here is not to force you to calculate every addition by hand: it’s to help you understand what the spreadsheet is doing and what those salt additions are actually changing in your mash liquor.
With that in mind, let’s dive in. Let’s say your water report and target profile look like this:
Starting Water
- Calcium (Ca): 10 ppm
- Chloride (Cl): 34 ppm
- Sulfate (SO4): 41 ppm
Target Profile
- Calcium (Ca): 50 ppm
- Chloride (Cl): 100 ppm
- Sulfate (SO4): 75 ppm
- Mash liquor volume: 25 bbl
Step 1: Find the Mineral Gaps
First, let’s determine the mineral gaps we are trying to close:
- Chloride: Gap = 100 – 34 = 66
- Sulfate: Gap = 75 – 41 = 34
We’ll come back to calcium at the end. Since both calcium chloride and calcium sulfate add calcium, we want to see where those additions leave us before deciding whether anything else is needed.
Step 2: Convert Barrels to Gallons
Next, let’s convert our mash liquor volume to gallons:
- 1 bbl = 31 gallons
- 25 bbls × 31 gallons = 775 gallons mash liquor.
Step 3: Choose the Salt Contribution Values
For the next part, we need some more information on our salts. Calcium chloride is commonly used to increase chloride, while gypsum/calcium sulfate is commonly used to increase sulfate. The exact contribution values depend on the form of the salt you’re using, so use the values from your calculator or supplier.
The values below are real brewing-water calculation values, not placeholders. They’re the same general kind of numbers you’ll see in brewing water calculators, though exact values can vary slightly depending on the form and purity of the salt. For now, don’t worry too much about that distinction—just use the values from your calculator or supplier when making actual additions.
If you’re interested in looking up other ion contributions from different salts, John Palmer’s How to Brew, 4th ed. lists many of them (pg. 344-345). Also, a web search would likely yield the results you’re looking for!
Calcium Chloride (CaCl2) – Dihydrate
- Calcium (Ca) ion contribution: 72 ppm per gram per gallon
- Chloride (Cl) ion contribution: 127.4 ppm per gram per gallon
Important note: Not all calcium chloride is the same. Calcium chloride dihydrate is what’s used in this example and is commonly available, but your supplier may sell anhydrous calcium chloride instead. Make sure you know which you’re using, because the anhydrous form contributes more calcium and chloride: 95.4 ppm calcium and 168.8 ppm chloride per gram per gallon.
Calcium Sulfate/Gypsum (CaSO4)
- Calcium (Ca) ion contribution: 61.5 ppm per gram per gallon (note that CaCl2 and CaSO4 have different impacts on calcium!)
- Sulfate (SO4) ion contribution: 147.4 ppm per gram per gallon
Step 4a: Calculate the Calcium Chloride Addition
With this information we can do our calculations. Here’s the formula once more to make it easier to follow along:
- Salt needed (in grams) = mineral gap ÷ ion contribution from salt × water volume
Let’s start with chloride:
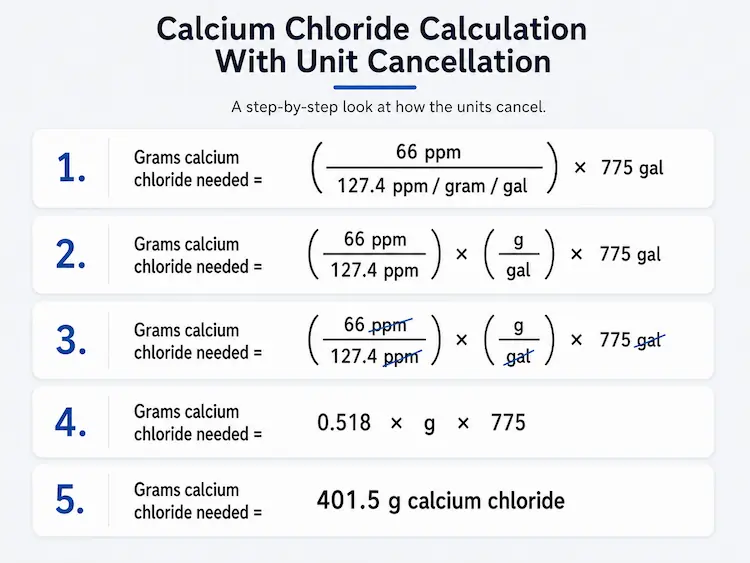
- Grams calcium chloride needed = 66 ppm ÷ 127.4 ppm per g per gallon × 775 gallons = 401.5 g of calcium chloride added to the mash
In other words, we need 401.5 g of calcium chloride to move our water from 34 ppm to 100 ppm. Here’s how it looks visually and with units being canceled:
Step 4b: Calculate the Gypsum Addition
Next, let’s calculate the calcium sulfate/gypsum addition:
- Grams gypsum needed = 34 ppm ÷ 147.4 ppm per gram per gal × 775 gal = 178.8 g gypsum added to the mash
So we need 178.8 g of calcium sulfate to move the sulfate level of our water from 41 ppm to 75 ppm.
Step 5: Check the Final Calcium Level
Finally, let’s check our calcium level. Both calcium chloride and gypsum contribute calcium, so we need to see where our final calcium level ends up.4
- Calcium from CaCl2: 401.5 g × 72 ppm per g per gal ÷ 775 gal = 37.3 ppm of calcium
- Calcium from CaSO4: 178.8 g × 61.5 ppm per g per gal ÷ 775 gal = 14.2 ppm of calcium
- Total Calcium Added: 37.3 + 14.2 = 51.5 ppm calcium
Our starting water already had 10 ppm calcium, so our final calcium level is:
- 51.5 ppm Ca added + 10 ppm Ca in water = 61.2 ppm Ca in mash
Great news: we’re above 50 ppm!
Other Considerations
What about other salts?
The same basic formula works for other brewing salts too, as long as you know how much of the relevant ion that salt contributes. For this example, though, we’ll stay focused on calcium chloride and gypsum.
What if you don’t end up above 50 ppm calcium?
If you’re close to 50 ppm, you’re probably fine. Malt contributes some calcium, so the number from your water calculation is not necessarily the full story.
That said, if you’re far below 50 ppm, it’s worth revisiting your additions. You may need to adjust your calcium chloride or gypsum additions, or decide whether a different salt makes sense for the beer you’re brewing.
A Note on Water High in Mineral Content
So far we’ve been assuming that we have water with generally low mineral content. Well, what if you live in an area where it’s high and exceeds the requirements for the beer you want to make? That’s a tougher situation but you’re not without options. None are as simple as adding salts, but they’re worth considering.
There are a few different ways to reduce the mineral content of water, but only two of them directly impact chloride or sulfate levels: ion exchange and reverse osmosis.5
Ion Exchange
In ion exchange systems, water is run through a resin. Some systems remove positively charged ions while others remove negatively charged ions. They can be used separately or in sequence.
Reverse Osmosis
Reverse osmosis is a form of filtration that removes most minerals from water. Mineral-free water isn’t ideal for brewing on its own, but it gives brewers a blank canvas for building the profile they want.
Dark Beer
Water considerations for dark beers are more complicated. On top of calcium, chloride, sulfate, and mash pH, we also need to consider residual alkalinity (RA).
Residual alkalinity matters for every beer, but it becomes especially important with dark beers because dark malts contribute more acidity. The fast-and-loose way to think about it is this:
- If your water has a negative RA, your mash pH will be lower;
- If your water has positive RA, your mash pH will be higher.
That means water that works beautifully for a pale beer may not be the right fit for a stout or porter.
There’s a lot more to say about residual alkalinity—enough that it deserves its own post. For now, the main point is simply this: dark beers add another layer of complexity.6
Bringing It All Together
Water chemistry can feel overwhelming, but it doesn’t need to be all-or-nothing. You don’t have to account for every variable before you can make useful improvements.
For many pale and amber beers, simply focusing on mash pH, calcium, chloride, and sulfate is not only a practical place to start, it will yield meaningful improvements. Those adjustments help you move from a generic water profile toward one that better supports the beer you’re trying to make.
The point isn’t to chase numbers just for the sake of chasing numbers. The point is to make more intentional decisions—and, ultimately, better beer.
Nassim Sultan is the founder of BarrelVision, a brewery consulting business focused on helping breweries make better beer, save time, and reduce costs. He has been in the beer industry since 2013, working across the full breadth of small brewery operations—from cellar work and brewing to lab operations, logistics, maintenance, recipe development, and staff training. A former head brewer, Nassim is especially interested in how process, product quality, and front-of-house beer knowledge work together to shape the guest experience.
- Try searching for “[municipality/state] water treatment plant” or “[municipality/state] annual water quality report.” You may need to do some digging. For example, “Arlington VA Water Treatment Plant” may lead you to Arlington County, but Arlington’s drinking water comes from the Washington Aqueduct, so that’s where the more useful historical water data is found. Also, don’t be surprised if the report is incomplete. When I contacted the plant in Rockville, MD, in 2017, they were helpful, but they didn’t test for sulfate because it wasn’t required to report. If you can’t find reliable data, water testing is another option; testing a few times throughout the year can help you understand seasonal variation. ↩︎
- While ppm and mg/L are not 100% the same, they are functionally the same. As such, if you find yourself using both, simply consider them equivalent, i.e., 100 ppm Ca = 100 mg/L Ca. ↩︎
- This formula is simply a reconfiguration of this formula: Concentration Gap (ppm) = Brewing Salt Addition (g) × Ion Component ppm per gram per gallon ÷ Water (gal). ↩︎
- Malt adds calcium as well. For the sake of simplicity, we are going to ignore that for now. ↩︎
- Pre-boiling water is a method that can be used to reduce alkalinity; lime softening is a method that reduces temporary hardness. Both approaches are excellent tools. However, neither one impacts chloride and sulfate and so, within the context of this post, they’re not worth highlighting. ↩︎
- If you’re interested in learning more, John Palmer’s How to Brew, 4th ed. has a section on residual alkalinity (p. 343). Jack Hendler and Joe Connolly’s Modern Lager Beer also has an excellent, more practical section on residual alkalinity (pp. 64–66). ↩︎